Staying organized is critical, especially when you have thousands of documents and creating a filing structure coupled with consistent file naming in such cases can be challenging especially with a multi-user system. Docsvault allows a very flexible Filing Template that can generate a Filing Structure with consistent File and Folder names based on corresponding index values entered for the document/s being imported. Now, users can relax about where to put documents when they're importing it.
Filing template can also generate file & folder descriptions and notes automatically based on the Profile values entered.
Why use Filing Template?
Filing Templates help you maintain a consistent filing and naming policy of files and folders. As documents are imported into Docsvault, they can be automatically filed and named based on index values entered by users. The filing template can be used whenever you manually import files or folders into Docsvault.
For instance, filing document from different projects in their own respective folders say, Work Contract for Project Bell. With Filing Template, you can index the documents by both attributes (Project Bell, Work Contract), making a rule to dynamically create a folder project-wise (Project Bell) if not created and import Work Contract document into it.
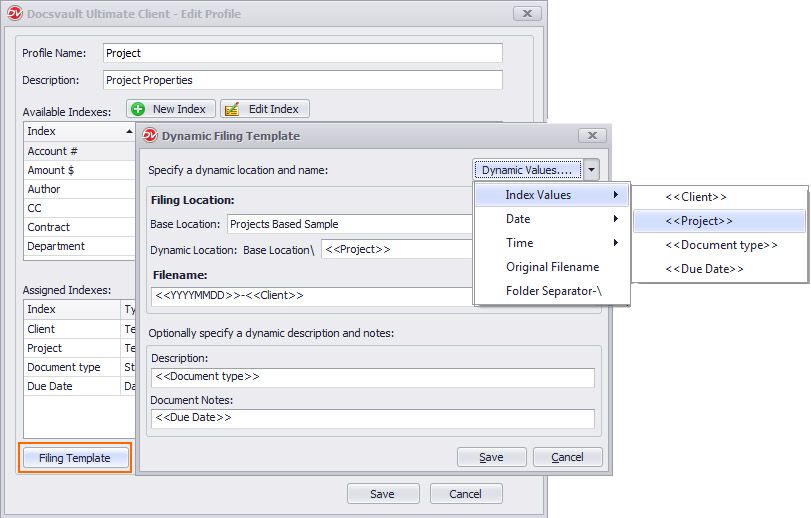
•In Profile dialog, click Filing template button.
•Base Location: Specify the location in Docsvault to save documents. ex: Project\
•Dynamic Location: You can use Dynamic Fields from the 'Dynamic Values..' drop down list box on the right.
ex: selecting index field <<Project>>. This will automatically file documents into appropriate folders based on captured
dynamic values. ex: This will import Work Contract file in the Project\ under a dynamic sub-folder named
"Project Bell".
Note: For Auto Filing, you have to ensure the 'Base Location' is defined. Auto-filing will not work if the base location is left empty.
•Define File name, description and notes. You might consider including some of the following information, but you can include any other information that will allow you to distinguish your files from one another.
▪Dynamic index values such as Project, Client Name, Suppliers, Authors, Revision number, Employee ID, Department, Date etc
You can even extract month and year from ‘Date’ index fields to use them in Auto-naming and filing of documents.

Dynamic Index Field - Date split
▪Dynamic Date/ Time ex. <<YYYY-MM-DD>>, <<HHmmss>>
▪Original Filename: You can use the original filename as part of a naming option.
▪Including prefix or suffix
The dynamic values once assigned during the import process will prevent further editing of the file name, description and notes.
•Click Save to save the Filing template.
 |
Autofile Profiles can be selected as default for any folder in the available profiles settings. It can also be specified in predefined ‘Folder Templates’ and ‘Profile Templates’.
•When the specified Base location does not allow saving files due to folder restrictions set at cabinet level, you must either remove the restrictions at the base location or specify at least one mandatory index field for the dynamic location. The system will create the entire folder structures corresponding to restricted folder template and auto file the files in the dynamic location specified.
|
Administrators and users with system right 'Create Profile/Indexes' can apply auto-filing to document profile by configuring Filing Templates.
Document Profiles can be configured to automatically name and file documents in Docsvault based on rules set on index values. Auto-filing can work when importing and profiling a document from many places like the Drop Zone, Import Documents dialog, the Microsoft Office add-ins integration, right Profile panel, Document Properties dialog, the Scan interface, and the Filing Area. Documents are then auto named and filed into the appropriate folders based on predefined rules set in Filing Template of a Profile. This feature helps in maintaining consistent file names, reduce misfiling and makes bulk importing of documents very easy.
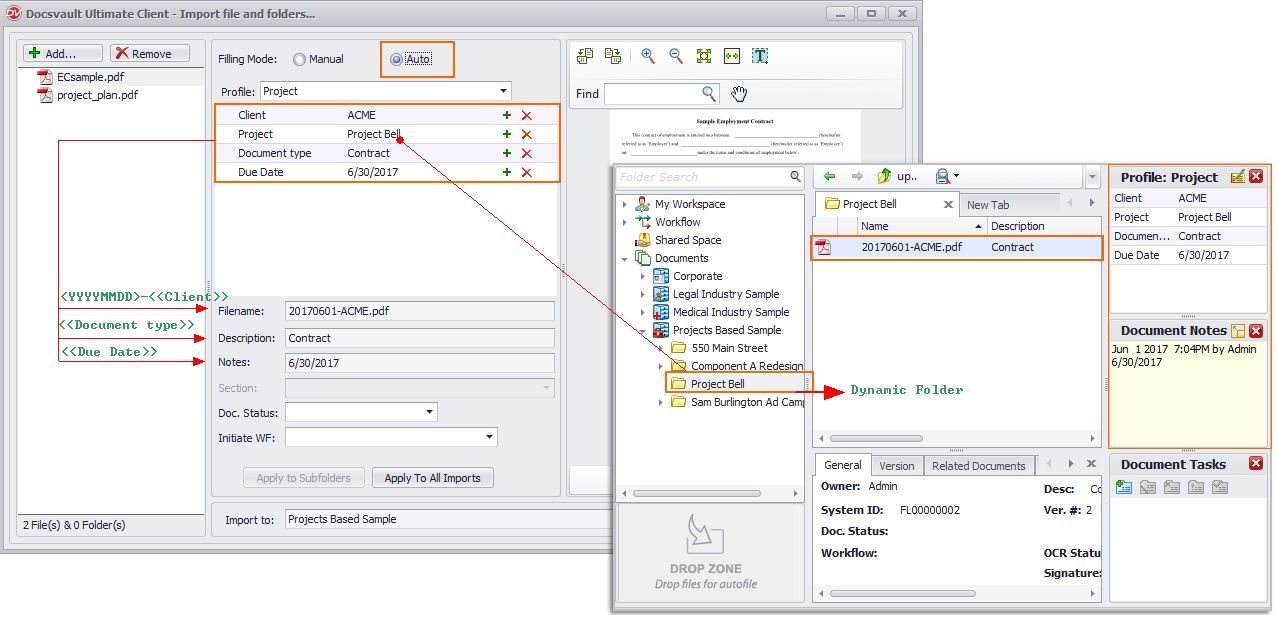
To automatically file documents from the Import Document dialog
•After Filing Template has been applied to any profile, Auto filing option would be enabled
•On choosing Auto option, all the available Profiles with auto-filing would be displayed in the drop-down list for selection.
•As in the image below, when a user assigns profile to a file, the system will automatically detect/create a destination folder based on index values. This will also automatically name the file, add description and notes based on rules set in the Filing template of the selected Profile.
 |
•For General which is a default profile, you can only set file-naming, description and notes based on the index values. Auto Filing can't be configured in case of General profile.
|