This feature is only available as an add-on module and requires separate purchase and activation.
|
Docsvault's Advanced Import add-on is an extension of the simple import feature and is typically used to capture data exported from other applications or scanning software. Using the Advanced Import method, documents from a watch folder can be imported based on their meta data available in separate csv index files. You can automatically name and file documents based on captured meta data while populating their document profiles in Docsvault.
Importing files using Watch Folders - Advanced Import Mode
Docsvault's Advanced Import add-on is an extension of the Simple Import feature and is typically used in conjunction with a third party application exported data or other high volume scanning software.
Using the 'Advanced Import' method, documents from a watch folder can be imported based on their meta data available in separate csv index files. You can name and file documents dynamically based on document meta data captured from these index files. Docsvault will even create new folders on the fly as necessary based on the index values and filing rules set. This process of capture is a fully automated and highly accurate method of filing documents generated from scan stations or third party applications.
The Docsvault Advanced Import module is very flexible and is able to capture meta data from csv index files generated by practically any application.
To Set Up Watch Folders in Advanced Import Mode
•Select Advanced Import node in Docsvault Server Manager. This will display list of watch folders configured on the server.
•To setup a new import job, click on New button.
Step 1: Basic Settings
Source Setup:
•Name: Enter a sensible name for this import job
•Watched Folder: Specify location of the folder to be watched
•Docsvault watch folder service can also watch sub-folders for new file activity (sub-folders are enabled with the check-box 'Include Subfolders')
Source Options:
•Set the time interval for the Docsvault watch folder service to check for new files and folders to import
•You have an option to either preserve the original system date and time (created and modified) of files/folders being imported or use the actual date and time of import in Docsvault
•You can handle the files and folders by selecting one of the following options after they have been imported into Docsvault
oKeep source files at original location (Docsvault looks for new files based on their created/modified date)
oMove source files to backup folder at source (files are moved to a folder named 'Docsvault_Imported' at the source location)
oDelete source files
 Watch Folder Wizard - Step 1 |
Destination Options
Typically when using the 'Advanced Import' module you would not select the 'Filing Area' as destination since the purpose of the advanced import job would normally be to file document directly to the Docsvault repository.
oImport to Filing Area: Rarely used. Used only when it is critical to manually check for imported documents before making it available to all users of Docsvault by holding them first into the 'Filing Area'
oImport directly to following location: Select this option to specify a base location for the automated import. This typically could be a cabinet or a high level folder
•Click on the Next button to continue
|
If the files or folders are being used by any other application during the actual importing process they will be skipped.
|
Step 2: Advanced Capture Settings
Capture Based On:
There are two ways to base the capture of documents on:
•Index File: Documents are captured based on a index file. Docsvault determines the list of files and their corresponding location in the 'Watched' folder based on values in these index files. Using this method the capture job will not import any files that are not mentioned in the index files.
 Capture Based on Index File |
•Actual Image Files: Documents are captured based on the actual image files. In this method of capture, Docsvault first lists all qualified files to be captured in specified watch folder and then searches for its corresponding index values based on the rules specified in the job. This method ensures that all files are captured even if they have no corresponding information in any index file.
 Capture based on Actual Files |
•Actual Files W/O Index: All documents in the specified watch folder are captured without the need for any corresponding index values. Documents are captured based on the file extension e.g. .pdf, .doc or email files (.eml and .msg formats). In this method of capture, no index files are necessary for the capture process and the import job will capture all files (or specified extensions under the File Filters option) from the specified watch folder.
Auto Capture Email Metadata: Enabling this option will extract metadata from email files (.eml and .msg formats) that can be mapped to any index field within Docsvault.
 Capture based on Actual Files w/o Index |
Index File Setup:
Once the method of capturing is decided, you will need to configure capture fields from a sample index file for capturing document meta data. For more information on sample index files, see Sample Index File Structure for Auto Imports.
•Sample Index File: Select a sample index file in CSV format created by any third party application that you want to use for this job. Please note that the filename shouldn't be longer than 64 chars and the total length of the path and the file name, including file name extension, should not exceed 256 characters.
•Encoding: Select encoding of the CSV file. Supported encodings are ANSI, UTF-8 and UTF-16
•File Location: Specify the relative location of this index file within the watch folder
Select one of the following options:
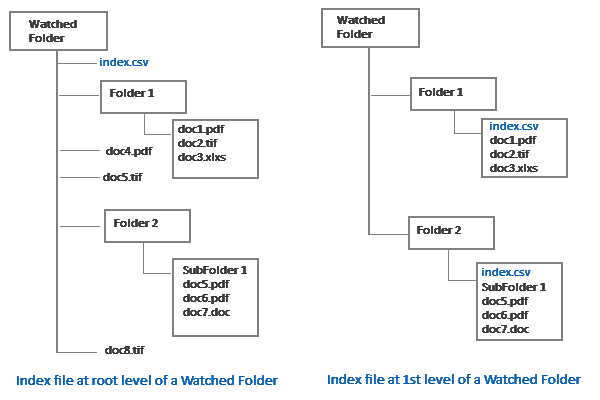
oOne per Root Folder: Select this option if the index file is located at the root level or in the first level subfolders of the Watched folder specified in Step 1. For this case, the structure in the Watched folder would be as shown in the figure below:
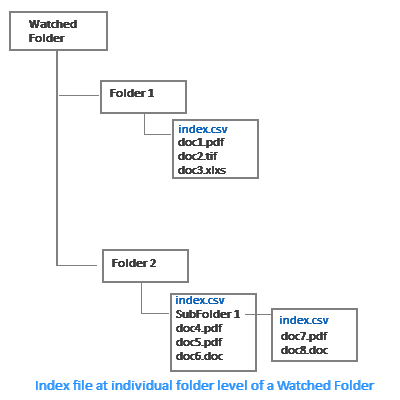
oOne per Folder: Select this option if the index file is located in each individual sub-folders of the Watched folder specified in Step 1. For this case, the structure in the Watched folder would be as shown in the figure below:
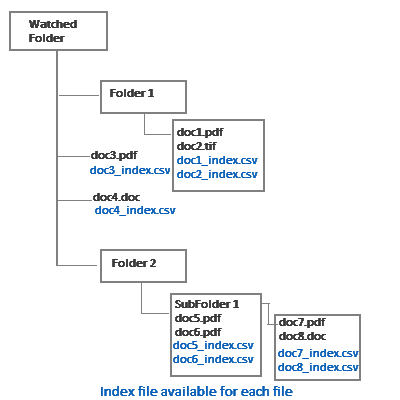
oOne per File: Select this option if each file has its own separate index file. The Index files must be in the same directory as the files being imported. For this case, the structure in the Watched folder would be as shown in the figure below:
|
•Index Filename: Specify the file name of the index file. Apart from using static index file names you can also make use of dynamic fields for identifying a index file e.g <<Folder name>>.csv, <<Image_File_Name>>.csv, etc. During the import, the index file is automatically selected for each document based on its location and matching filename.
•Import Index File too: By default, index files are not imported. Select this option to import the index files along with the image files.
File Name Mapping:
This section allows mapping of filename and their location in the index files with actual accessible paths.
•Import Filename Field: Select the field in index file that contains the filename or location path for files to be captured
•Evaluated path upto base capture folder: Once you select a filename/path field, Docsvault automatically determines the common path up to the base of the capture folder. If the evaluated path is not correct please use the 'Edit' button on the right to correct this path. It is important that this path be accurate as the import process will locate files based on their relative path starting from the base folder. Finding exact file locations in this relative way is necessary as the absolute paths in index files may not be accessible directly to the import process, especially if the files were created on other machines.
File Filter:
This setting allows users to capture only the desired file types and filter out unwanted files for an import job. Simply specify the file extensions for desired files to be captured separated by a ' , ' (comma). Example: pdf, doc, xls, tiff, tif – only these file types will be captured leaving out any other undesirable file types.
Step 3: Index Mapping & Filing Setup
Documents can be imported into Docsvault along with their meta data in corresponding index files. This section allows you to map captured index values & profile and dynamically file documents based on their captured index values. If Profile is specified, it will push a specific profile for documents being imported.
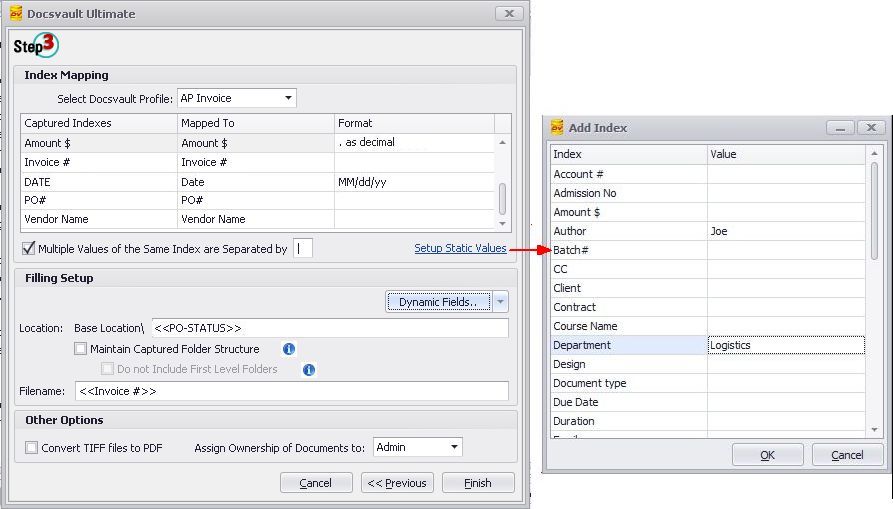
Index Mapping:
The Captured Indexes column will show all the indexes captured from the sample Index file selected earlier. Map (select) the corresponding Docsvault fields in the Mapped To column. You will also need to specify a format for Numeric and Date index fields.
Numeric Index Field: Set the decimal character for numeric fields as comma or period (ex: 0.00 or 0,00)
Date Index Field: Select a predefined date format for date index fields (ex: MM/DD/YY, M/d/yy, d/M/y, MMMM dd, yyyy, etc.). If a format you want is not available in the list, you may specify your own custom date format specifiers (y,M,d) and separators (“/”,”.”,”-“,” “).
Apart from Document Profile Indexes, you can also map captured values to a document's general information such as its Description, Folder Section, and Document Notes.
Multiple Index Values: If a field value separator is specified (example, delimiter like " ; " , " | ") multiple data from the same index field being imported can be assigned to the mapped index field in Docsvault.
Static Values: You can also have some standard repetitive meta data added automatically to Docsvault indexes by selecting the Setup Static Values button. This option will allow you to enter static values for any document profile index in Docsvault.
 |
Dynamic Fields
You can use dynamic fields in Auto-naming and filing of documents
•Image_Filename - To use original filename of image/document captured
•Index Values: Index values such as Project, Client Name, Suppliers, Authors, Revision number, Employee ID, Department, Date etc. You can even extract month and year from ‘Date’ index fields to use them for file-naming and filing.
•Date: To use dynamic Date ex. <<YYYY-MM-DD>>
•Time: To use dynamic Time ex. <<HHmmss>>
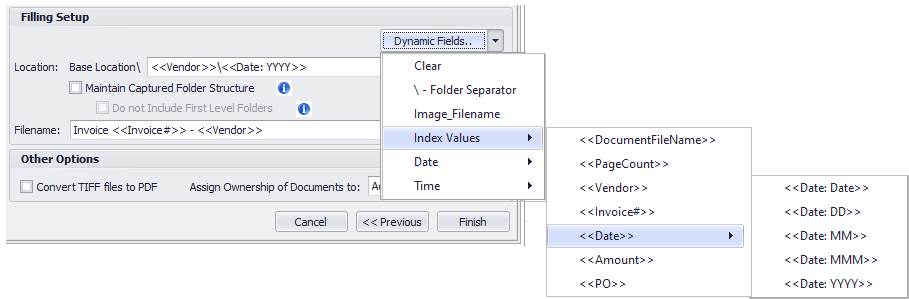 |
Filing Setup:
•Location: You can simply import all files at a base filing location (selected in Step 1) by keeping this field blank or define a rule for auto-filing documents using dynamic fields to detect/create a destination folder under the specified base location. If the appropriate folder already exists in Docsvault system, Docsvault will directly import matching files in that folder or create a new one if necessary.
•Maintain Captured Folder Structure: Select this option to maintain the folder structure hierarchy of the Watched folder (source location) within Docsvault
•Do not include First Level Folders: Select this option to ignore importing of the first level sub-folders. Useful for skipping batch or root level folders.
•Filename: You can name captured files based on any of the captured index values and/or dynamic fields like date, time etc.
Other Options:
•Convert TIFF files to PDF: Select this option if you wish to convert captured TIFF images to PDF format while importing into Docsvault system
•Assign Ownership of Document to: Sets ownership of the imported documents.
Sample Index File Structure for Auto Imports
This is a sample CSV index file structure that can be used to import documents using the Advance Import option. This example index file includes filename location (Doc_Location) that is to be imported along with other index values. These meta data fields can be mapped to Docsvault Profile Indexes and document's general information such as its Description, Folder Section, and Document Notes.
Doc_Name,Doc_Description,Doc_Location,Vendor Name,Invoice#,Status,Amount$,Date,Approver Inv#1002365.pdf,Project 404,D:\Invoice\Pending\Inv#1002365.pdf,"1347 Property",1002365,Verification,2500,02/12/2019,Joe | Anna Inv#0002417.pdf,Project 404,D:\Invoice\Pending\Inv#0002417.pdf,"1347 Property",2417,Verification,3444,5/6/2019,Joe | Anna Inv#00268.pdf,Project X Lab,D:\Invoice\Approved\Inv#00268.pdf,1st Source Corporation,268,Verification,500,5/31/2019,Joe Inv#884565.pdf,Project 48,D:\Invoice\Paid\Inv#884565.pdf,48_EXPRESS,884565,Pending,453,6/1/2019,Joe
|