|
Importing document from Filing Area
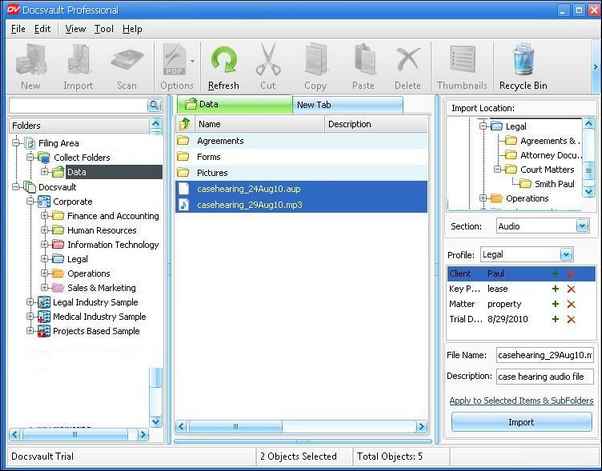
The Filing Area will display the documents for filings from local Collect Folders. This new filing interface allows quick document profiling and placement of imported documents.
You will be able to set your local Collect Folder from Tools > Options > Import menu. When any new documents that are copied or dragged into these Collect Folder, Docsvault will immediately list the documents in the Local Collect Folders for importing.
|
Local Collect Folder
|
| • | Highlight the files/folders for filing. |
| • | Select the folder in Docsvault from Import location section on the right panel. |
| • | On selecting the folder, its associated sections will be listed in the drop down box. Select the Folder Section. |
| • | Select Profile from the drop down list and enter index information into data fields |
| • | You have option to rename the file name before filing in File Name text box. |
| • | Apply to Selected items and subfolders, click on this option if you wish to apply the above details to all the selected files. |
| • | Click on Import button to begin importing your documents. |
To learn how to configure collect folder, see Filing Area.
 Note: Note:
| • | You can set Docsvault to automatically remove imported files from the originating hard drive folders after import by setting the "Delete source files after importing'" option in the Tools > Options> Import menu. If this option is not set then the duplicate document remaining on the hard drive is moved to the backup folder created by Docsvault on the same location.
|
| • | You can delete Unwanted or accidentally inserted files can also be deleted from the local Collect Folders. |
|
Page url:
http://www.docsvault.com/online-help/professional/index.html?filingarea.html
| 


