Setting Docsvault web application is easy. The web interface allows you to access Docsvault documents and folders directly from any browser.
The Docsvault Web installer will walk you through the installation and initial configuring of the Docsvault web application. The Docsvault Web Application is generally installed on the same machine as the Docsvault Server but it can also be installed on any separate windows machine as well.
Docsvault web application is only available in Docsvault Enterprise & Ultimate Editions
|
Before installing the Web Application please ensure that Internet Information Services (IIS) v7 or higher with ASP.Net v4.5 or higher is installed on your machine.
This session covers:
Installing/Enabling IIS Features
Installing Docsvault Web Application
Configuring Access From The Internet
Troubleshooting
Installing/Enabling IIS Features
To Enable the Web Server IIS Role on Windows Server OS
On a Windows Server OS, the Web Server (IIS) Role can be enabled by going to the Windows Server Manager and selecting “Add Roles and Features” under the Manage menu in the top right corner.
 Enable the Web Seserver IIS Role on Windows Server OS |
To install IIS on Windows Desktop OS like Windows 7, 8 or 10.
Go to the Windows Control Panel > Programs and Feature and then click the “Turn Windows features on or off” link on the left. In the dialog that appears, check “Internet Information Services”. Navigate to the “Application Development Features” under the “World Wide Web Services” node and check the ASP.Net option.
 Windows 7
|
 Windows 10 |
Install IIS on Windows Desktop OS |
|
Installing Docsvault Web Application
•Run the installation file Docsvault_Web.msi and follow the on screen instructions
•On the License Agreement page, read the license agreement and if you accept the license terms click on I Accept, and then click the Next button.
•Select Installation Folder: Installation folder contains the program files for Docsvault web application. By default the installer will choose 'C:\Program files\Docsvault Web\'.
•Click on Next button to go to the 'Confirm Installation' window.
•When installing the Web Application on the same machine as the Docsvault Server, all configuration is automatic and at completion you will see a success message with default access URL
 Web Installation |
Installing on a dedicated web server machine separate from the Docsvault Server Machine:
During installation you will have a choice of creating a new website or use an existing website on that machine to host the Docsvault Web Application. In most cases you will be creating a new website.
oCreate new website
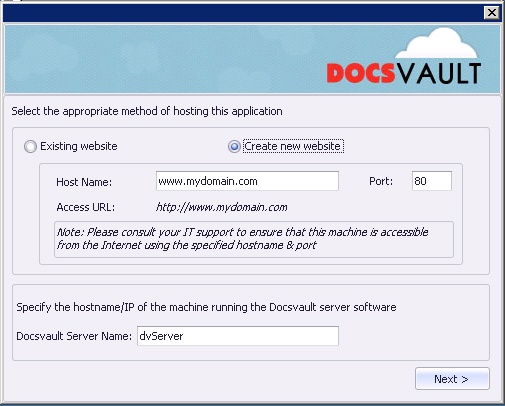 |
Host Name:
This is the domain or subdomain you will be using to access the Docsvault Web Application from the Internet. By default, Docsvault will use the local IP address of your machine as the hostname with a port number of 80. We recommend that you proceed with these values and change them later on from the IIS interface to specify your own domain name and to secure your web connections using an SSL certificate.
Docsvault Server Name:
If the Docsvault Server is installed on the same machine as well, the Docsvault Server Name will be filled in automatically with the value localhost. If you are installing this Web Application on a separate machine, fill in the hostname or IP address of the machine running the Docsvault Server. Click on next to complete the installation.
oUsing Existing Website
 Selecting Method of Hosting |
•Select this option to allow Docsvault web to configure with your existing web site hosted on this machine.
•Select Site: Select the existing web site configured on the current IIS server using the drop down list box e.g. http://example.com
•Application Name: Enter the virtual directory alias e.g if your website is accessible at http://example.com and you want to access Docsvault Web app at http://example.com/DMS, set this value to 'DMS'
•Docsvault Server Name: Enter the hostname/IP of the machine running the Docsvault server software ex: dvServer or 192.168.1.25
•Click on next to complete the installation. You will now see a Docsvault Web Manager icon on your desktop.
Testing The New Web Application
Before logging into the Docsvault Web Manager, you should open up the IIS Manager to verify the creation and working of the new web application.
 Opening IIS Manager |
To open up the IIS Manager, click on Start > Administrative Tools > Internet Information Services (IIS) Manager. This will bring up the IIS dialog as sown below:
 IIS dialog |
Click on the Browse Web Site link on the right to open up the Docsvault Web Application.
 Docsvault Web Client Application |
Login with one of the username and password you have created in Docsvault. This completes your verification. You should now be able to access the web application from all machines in your local network using the local IP address used to configure this site.
Learn how to enforce Two-Factor Authentication to securely login to Docsvault.
A secure SSL based connection is required to access your Docsvault repository using your iOS and Android apps. |
NOTE: Check the Troubleshooting topic at the end to see common errors during configuring Docsvault Web Application.
Configuring Access From The Internet
You now need to configure your own domain name to access the Docsvault Web Application from outside your office. For this you will need to do the following
1.Bind an existing domain name you own to the Docsvault web application from the IIS window
2.Login to your Router Web Interface and forward port 80 for regular traffic or port 443 for secure encrypted traffic
3.Change the A record of your domain or subdomain to point to the public IP address of your Internet connection assigned to your Internet Router. You may need the help of your domain provider or hosting company to accomplish this step.
Domain Name Binding & SSL Certificates
To ensure a secure access to your Docsvault web application you will need to use an SSL certificate. An SSL certificate is a digital certificate that authenticates the identity of a website and allows secure encrypted connections from your web server to a browser. You will need to get your SSL certificate from a trusted Certification Authority. Fortunately, SSL certificates are very inexpensive these days and a simple web search for buying an SSL certificate should give you plenty of options to choose from.
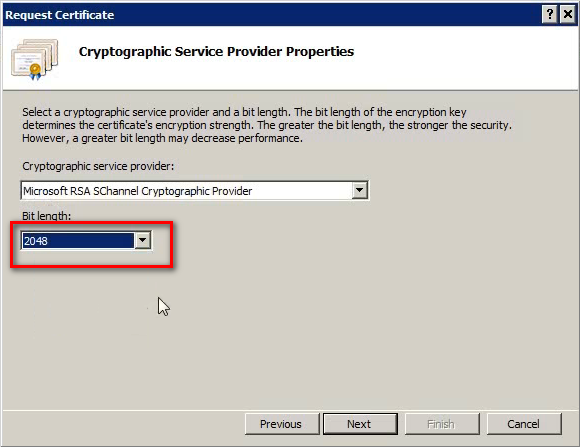
No matter where you buy your certificate from, you will need to create a certificate request from the IIS manager first. To do this, click on the Server Certificates icon in your IIS Manager.
 Server Certificates |
Now click on the “Create Certificate Request” link on the right.
 Create Certificate Request |
The common name MUST match your domain name exactly. Fill up the other necessary information and click next to proceed.
Most Certification Authorities will require that you choose 2048 as your bit length.
 |
Click on next to name and save your request file.
Follow the instruction of your Certification Authority to use this request and issue your unique SSL certificate that authenticates your domain. Your certificate will be sent to you as an email attachment or can be directly downloaded from your certification authority’s website.
Once you have your certificate, click on the “Complete Certificate Request” to install your certificate. Enter a friendly name for your certificate and click OK. Your certificate is now installed and ready for use.
 Complete Certificate Request |
Navigate to your web application site and click on the “bindings” link in the right menu. Click on the Add button to create a new site binding. Select the https option from the Type drop down and then select the certificate you just installed. Click OK to complete the site binding.
 Bindings |
You can now proceed with port forwarding in your router.
Router Port Forwarding
Login to your router interface with your router username and password and navigate to the port forwarding option for your router. Router interfaces vary a lot from device to device and you can get step wise instructions for your router at portforward.com. Note that you need to forward the TCP port 443 to the internal IP address of the machine running the Docsvault Web Application.
Following screen shows an example of the necessary port forwarding rule – your router interface will look different but will have similar option available.
 Router Port Forwarding |
Mapping Your Domain To Your Public IP Address
You will now need to point the domain or subdomain to the public IP address of your Internet. It is recommended that you have a static public IP address service from your internet service provider.
You will need to login to the control panel where your domain is hosted and edit the DNS settings to change the A record of your domain to your public IP address.
TIP: To know your public IP address simply type “my ip” in any search engine.
Once this is done you are now ready to access the Docsvault web application using a secure connection.
Note: Your URL should start with https:// to ensure your connection is secure.
Docsvault Web Manager Settings
Finally you should now login to the Docsvault Web Manager to set your default site URL.
Double click on the “Docsvault Web Manager” icon on your desktop and enter your admin username and password.
In the main Site node you should change the “Default Site URL” by clicking on the Edit button. If you are using SSL certificate to enable secure access, your site URL will start with https instead of simple http.
 Docsvault Web Manager Settings |
This completes the Web Application installation.
|
Having trouble in Docsvault Web Application Installation? |

The following are the common errors encountered during Docsvault Web Application installation.
•HTTP Error 500.19 – Internal Server Error
 HTTP Error 500.19 error message |
Reason:
ASP.Net component is not enabled for IIS.
Resolution:
Follow the instructions in Installing/Enabling IIS Features topic in the Web Application Installation guide to ensure that ASP.Net feature is selected during IIS installation.
•Could not load file or assembly ‘ChilkatDotNet4.DLL’ or one of its dependencies….
 ChilkatDotNet4.dll error message |
Reason:
Visual C++ runtime is not installed.
Resolution:
Download and install the proper runtime using the following links depending on your OS version. (note that on some machines it may be required to install both the 64 and 32 bit of runtime even if you have a 64 bit OS)
32 Bit OS
x86 Microsoft Visual C++ 2010 Redistributable Package
64 bit OS
x64 Microsoft Visual C++ 2010 Redistributable Package
•Unable to see icons/images in Docsvault Web Client
Reason:
Static Content is not enabled for IIS.
Resolution:
Follow the instructions in Installing/Enabling IIS Features topic in the Web Application Installation guide to ensure that ‘Static Content’ feature is selected during IIS installation.