Document Creation
Docsvault gives you the option to create a document once the form is submitted by your respondents. You can either automatically create a PDF file or map captured fields in a Word or Excel template document. The generated documents are stored in Docsvault at a predefine location and can even trigger a workflow for approval.
Options available are:
You can let Docsvault create a PDF file containing simple Field-Value pair data from the eFrom that form users submit.
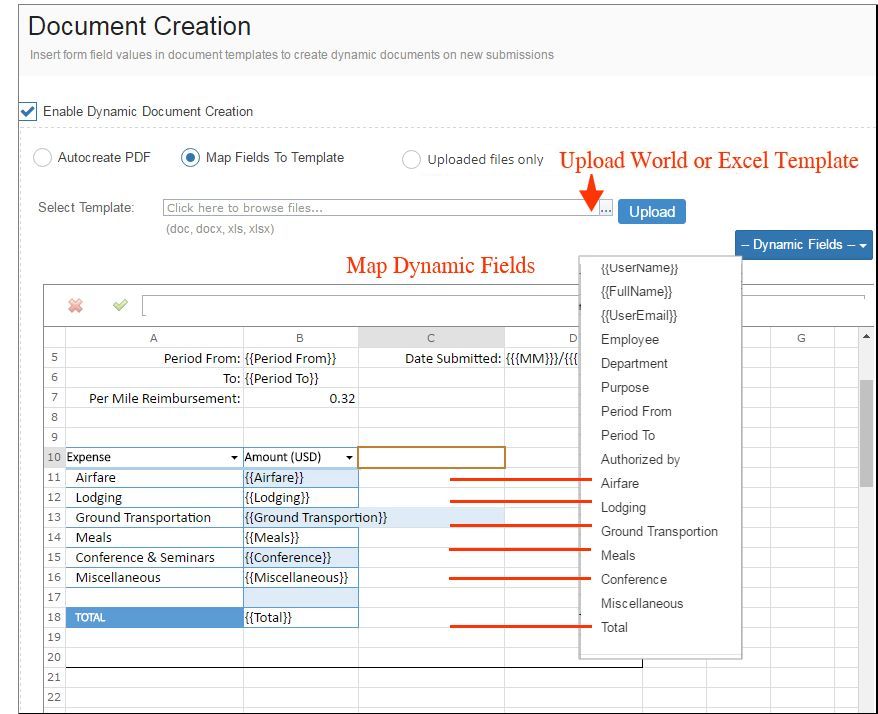
Select and upload any Word or Excel file as a base template for the new form document that will be created after the form is submitted. To map your Form fields with the content inside the template file, simply select the insert position inside the template document and select the data field from Dynamic Fields drop-down.
For example:
Applicant Name: {{Name.Full}}
The above example, when inserted in a document, will replace {{Name.Full}} with the data typed in the associated field in the form.
Applicant Name: John Doe
This is really useful for situation where you want to merge the data from the respondent with a pre-defined content and create a customized document. You can even map dynamic form fields in header and footer of a template document.
Docsvault Variables:
When users of Docsvault open up any form from within their Docsvault application, forms can also use the following predefined variables:
{{UserName}} - Docsvault current user name who submits the form
{{FullName}} - Fullname of current Docsvault user
{{UserEmail}} - Email address of current Docsvault user
Example of mapping dynamic fields in Excel Template:
 |
With this option selected, form users can upload their spreadsheets, resumes, tenders, invoices and more with their form entries. Files uploaded are saved at the predefined location in Docsvault without creating the main PDF form document. You can still view the form entries in ‘Submissions’.
This option is useful when you need to collect documents and directly trigger workflow on uploaded files. For example, the HR team may want an online form where job applicants can upload their resumes in PDF or Word format and automatically recruitment and selection workflow is triggered for recruitment process.
You will need to use the "File Upload" form field on your forms for end users to be able to upload files along with form submissions. Simply click and drag the ‘File upload’ field from the left "Add Field" panel onto your form. Click on the element in the form to set additional limit like type, size and number of files that can be uploaded.
Other Options:
Save To - Select the base location in the Docsvault repository to file the document created after submitting the form.
Dynamic Folder - You can also define a rule for auto-filing documents using dynamic fields to detect/create a destination folder under the specified base location. If the appropriate folder already exists in Docsvault system, Docsvault will directly import matching files in that folder or create a new folder if necessary.
Document Name - You can predefine a format to dynamically name the document created using Forms. (ex. creating document based on the Submission ID - {{ENTRYID}} )
Convert to PDF - Select this option to convert and save the original file format (Word or Excel) to PDF format.
Merge uploaded images and PDFs - Select this option to merge uploaded image files & PDFs as pages to main form document (PDF) created on Form Submission.
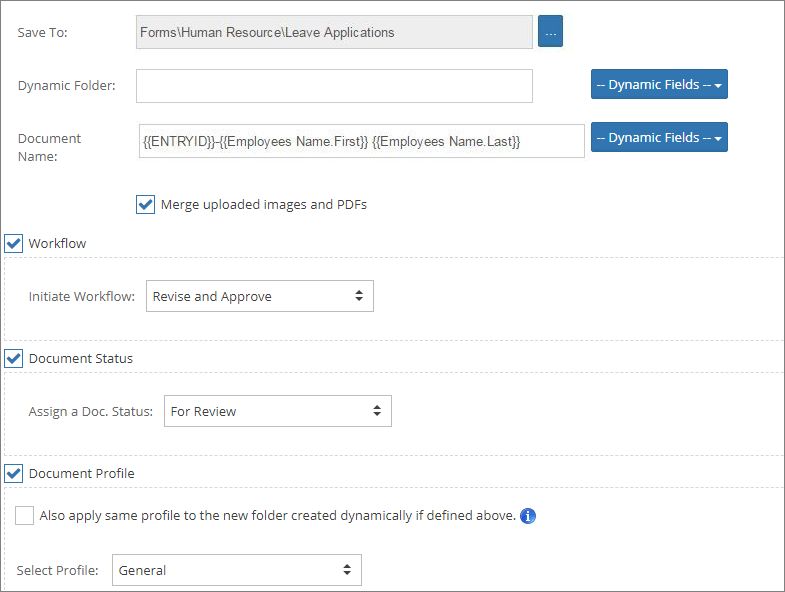 |
Workflow - Select this option to trigger specified workflow on the form document created on submission
Doc. Status - Apply document status on the document created after the form is submitted. Ex: For Approval, Draft Agreement, etc.
Document Profile - Select the desired Profile for the form document and map all index fields with form fields. If you have used a Profile Index type of field on your form, its mapping will be filled automatically.
You have an option to apply same profile to both the document and its parent folder (if created dynamically) based on filing rules.
Click Save button to save the settings.
•Document Profile, Status & Workflow, if set, will automatically be assigned to all form attachments too |