Sending a Signature Request within Docsvault is as simple as right clicking on the document and filing out necessary signer information. Documents need to be in PDF format for signature. However, you can easily create a PDF version of Word and Excel files in Docsvault with one click before sending out a signature request.
•Only users with Digital Signature subscription can create signature requests
|

Important: Complete your edits before sending the signature request. Editing a signed document after it has been digitally signed will invalidate the signatures.
•You can initiate a signature request from Signature Requests under My Workspace > Public Links in the left panel of the Docsvault interface by clicking the New button OR
Directly from the documents list by Right-clicking on the file(s) and selecting Request Signature
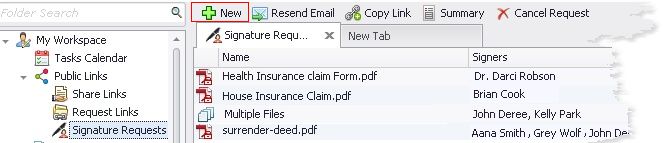 Signature Requests Node |
•A pop-up dialog will appear where you can add signers and set options.
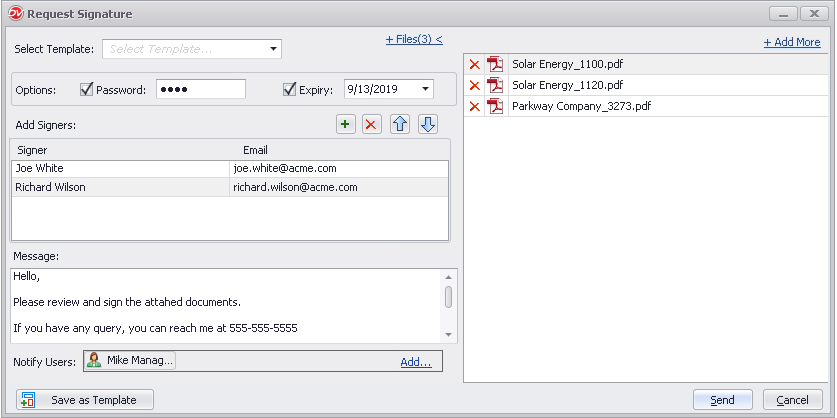 Create a Signature Request |
•Select Template: This lists all saved templates with pre-defined signers, messages and other options. You just need to make necessary changes and you are ready to send out a signature request.
If you frequently send signature requests to the same people or of the same type, templates are a great time-saving way to go. To learn how to create a template, see Signature Request Template
•Options:
oPassword: If you're sharing sensitive documents, you can add a password for additional authentication. You can then share this password with the signers by other method of communication.
oExpiry: Sets how long you want the signature request link will be accessible for both signing documents as well as downloading them once signing is completed. By default, links will be valid for 30 days. You can adjust the default expiration of your signature request link id desired. Once the expiry date passes the requested link becomes invalid which means signers will no longer be able to sign or access the documents. You can then either extend the validity or create a new request.
•Add Signers: Enter the Signer's name and email in the order you want the document to be signed. You can add any number of signers by clicking on + button. They will be sequentially added to the signature workflow.
You can select signers from your Docsvault's Address book. When you enter the signer's name and if a match is found in the address book, Docsvault will automatically fill up the email address.
You can reorder the sequence of the signers by clicking on up and down arrow buttons. To remove the signer from the list, select the specific row and click on the delete button.
If there are multiple signers, they will get an email notification in a sequential order. When the first signer signs and submit the document, an email is sent to the next signer on the list. Signers only receive an email notifications when it is their turn to sign. Once the documents are signed by all the signers, everyone gets an email with a link to download the signed documents and optionally the signature certificate documenting the entire signature process.
•Add files: You can send multiple documents in a single signature request. Click +Files link to expand the dialog. This right panel will list all the files selected for a signature request. For best performance, Docsvault recommends restricting the maximum size of an individual file to 20 MB. You can attach a maximum of 5 files in a single signature request.
oTo include additional files, click + Add More link
oTo remove a file, select Delete icon next to the file
Note: Docsvault will check out and lock the files for further editing until the request is completed or canceled.
•Message: Here, you can add an optional message for signers.This message will be displayed in the email requests and in the browser before signing the documents
•Notify Users: Select Docsvault users who should be notified about the progress of this signature request.
•Click on the Send button to send out the signature request.
An email is sent to the signers on behalf of the sender that includes a message from the sender and a link to view and sign the documents.
Senders can view and manage their signature requests from their Docsvault application under My Workspace > Public Links > Signature Requests.
•PDF files with password security enabled cannot be signed
|

Creating your Signature Request Template is a simple process. You only need to complete the fields and options you need and then click on the Save Template button. Give a meaningful name to the template and make the Visibility Public or Private. If you want all the users to have the privileges to view this saved template, select Public or else Private for personal use only. The next time you need to create a similar signature request, you can select this template from the top “Select Template” dropdown menu