This feature allows you to prompt you to save your sent emails to Docsvault. This helps in maintaining a centralized repository of all your important email communications.
Enabling the Feature:
1.User Configuration:
oYou can enable this setting from the Options form of your Outlook Add-in.
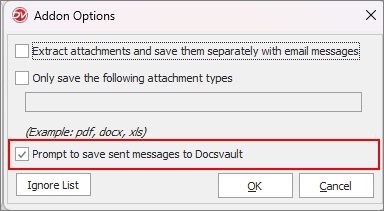
oUsers can also set their 'Ignore List' to ignore prompts for specified email accounts or domains to ensure that the prompts are kept to a minimum.
2.Admin Configuration:
oYour system administrator can enable this feature from global User Settings in the Docsvault Server Manager.

MS Outlook Save Sent Message Setting
oAdministrators can create a system-wide ignore lists of email accounts to exclude in the automating saving process.
▪Go to Add-Ins menu in MS Outlook and select Docsvault > Options.
▪Open Ignore List: Click on the Ignore List button.
▪Add Email Accounts: Click Add to add email accounts you want to exclude from the automatic saving process.
▪Set Visibility: Choose whether to make the ignore list public (visible to all internal users) or private (only visible to you).

MS Outlook Save Sent Message Setting
How it Works:
•Email Sent: When you send an email, Docsvault prompts you to save it.
•Email Captured: The system identifies eligible emails,excluding those on the ignore list.
•Email Indexed: Captured emails are indexed and stored in Docsvault.
•Email Accessible: You can access and search for these saved emails within Docsvault, just like any other document.
Steps to Save Emails

Save Sent Message
•Prompt to Save: When you send an email, Docsvault will prompt you to save it.
•Select Destination Folder: Use the Docsvault navigator to choose the desired folder.
•Provide Index Information: In the Import Files and Folders dialog, select a profile and fill in the necessary index fields (description, notes, etc.).
•Import Email: Click the "Import" button to save the copy of the email as a .msg file in Docsvault, The original email will remain in your Sent folder.
Note on Attachments:
•Depending on your attachment preferences in the Add-on Options, attachments may be:
oEmbedded directly into the saved email.
oSaved separately in a designated folder.
•You can view and manage these attachments within Docsvault.