Applying Digital Signatures
Any user that has a digital certificate issued to them by Docsvault administrator can digitally sign a document.You can sign a document to attest to its contents or approve the document in a normal approval workflow.
Docsvault's Digital Signature add-on is also compatible with our Desktop & Web Clients. Users can sign documents from anywhere using desktop client and standard web browser. You can even collect signatures in person or send signature requests to anyone outside the organization e.g signing contracts or obtaining customer signature for approvals, etc.
In addition to usual PDF documents, Docsvault also allows you to sign Word, Excel, Text and Tiff files and convert them to digitally signed PDFs.
To sign a document
•Right click on the file and click Sign Document.
•This will open the document in a new Sign Document tab. This is your main signing dialog where you can sign documents
•To sign or add annotations you need to select the page of your document that you would like to work with first. Click on the Thumbnail icon at the right by scrolling through the page guide to locate the page you want.
•Select the appropriate Annotations icon from the left panel
 Digital Signature Web Interface |
Annotations
Digital Signature includes annotations that streamlines the signing process for faster document turnaround and better user experience.
•Signatory's details: full name, first name, last name, email address, position, date
•Text boxes
•Place full signature or just initial
•Option to get signature from others outside the organization. See Sending Signature Requests.
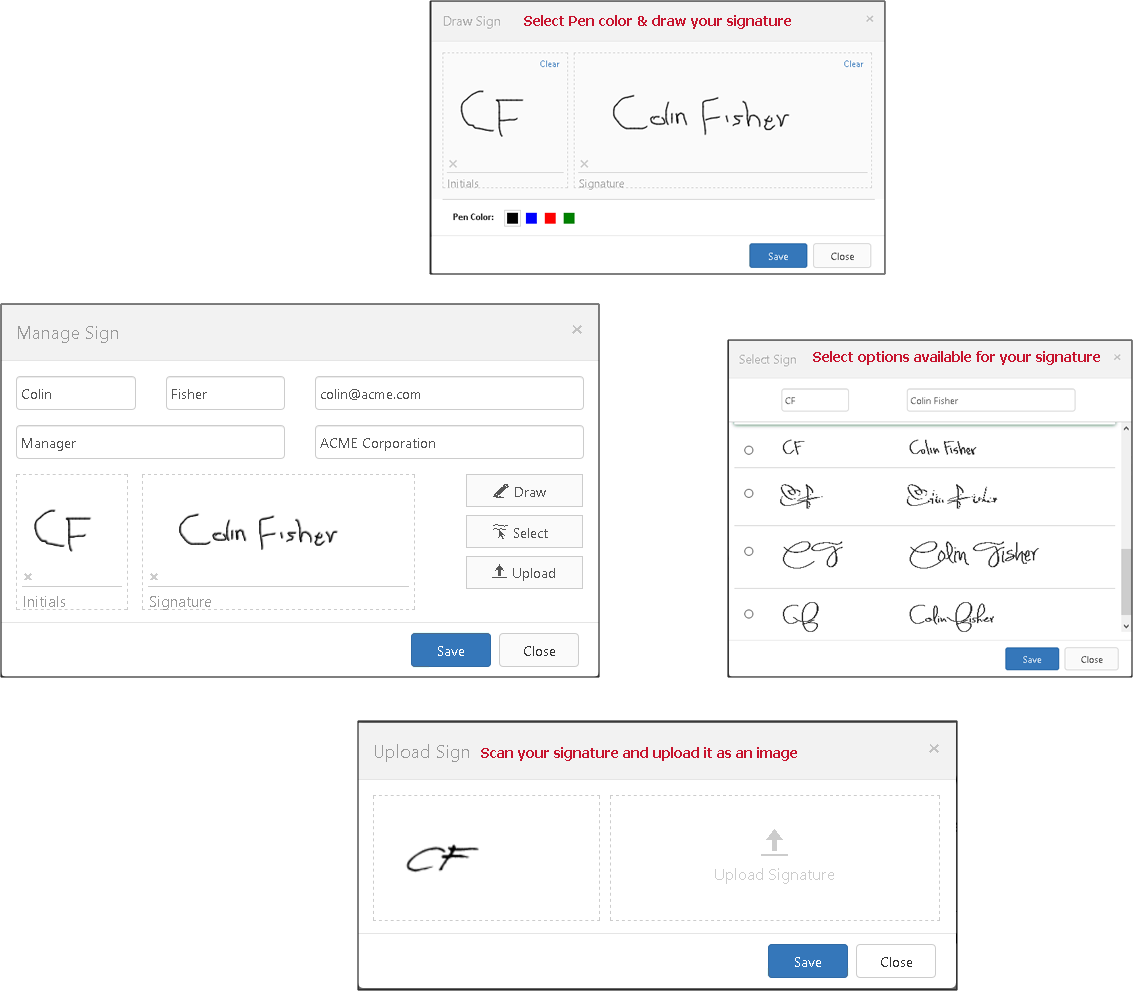
Manage Sign: Allows you to manage your personal preferences, such as your name, title, company's name, initials in addition to your signature and initials. You can either draw your signature, select from many available styles or upload an image of your signature.
 |
Sign: Click to use the signer's full signature
Initial: Click to use the signer's initials
Date Signed: Click to add signature date
Name: Click to use the signer's full name
First Name: Click to use the signer's first name
Last Name: Click to use the signer's last name
Email Address: Click to use the signer's email
Company: Click to use the signer's company name
Title: Click to use the signer's job title
Text: Allows you to add multi line text box
Checkbox: Allows you to added check marks
Cross: Allows you to insert cross marks
•Click on the icon and place it on a document at desired location. The guide box can be re-sized dragging the corners.
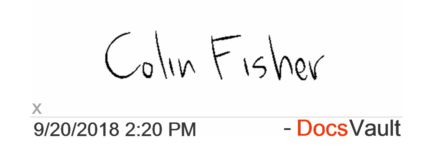
•When you're done signing your document, click DONE from the top right corner of the signing window. Docsvault will automatically put a date and time stamp under the signature. The value and format of the date field will match either your computer when using the desktop client or your web server when using the web client.
 |
Your document with the signature would appear in the document listing. If you had signed a Word, Excel, Text or Tiff file, it will automatically be converted to digitally signed PDF. You can then export, print or email the signed document.