Workflow Steps:
A workflow consists of several Steps that a document will undergo in a business process. Each step can have different participants(users responsible for tasks in the step), due date and time, reference documents, transitions (actions users can perform in this step), notifications, etc. The workflow step wizard is dividing into the following four areas:
1.General - name and other general information about the step
2.Transitions - list of choices(actions) a user can perform on this step
3.Automatic Actions - changes the system can perform automatically when a transition is performed
4.Notifications - various notifications before and after the task in this step is due
1.General:
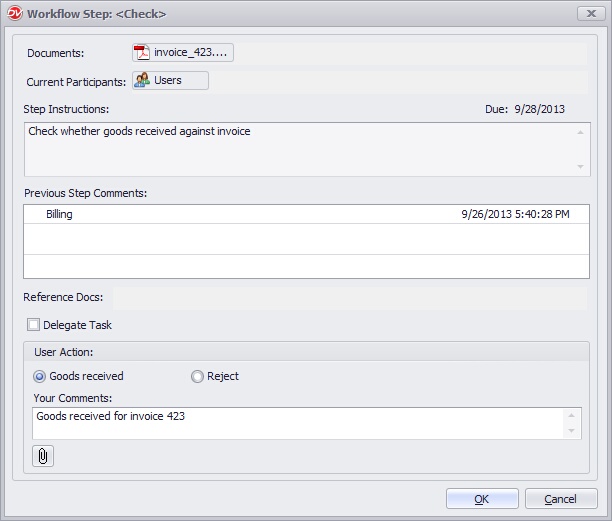
Specify the general information for the Step.
•Name: Short sensible name for the step
•Instructioadmn: Instructions for the task to be performed in this step
•Participants: Users and/or groups that will be participants of this step. A workflow Participant is any user or group that is assigned to perform a task in a step. User can also change the participants for the next step during the actual workflow process instead of this predefined participants list.
You also have an option to add Dynamic Participants to any workflow step through the use of the “Users/Groups” dynamic index field. Participants of a workflow step would be based on the value assigned to user/group index filed associated with a document See, Adding Dynamic Participants
•Reference Docs: Reference documents that would help step participants in completing their task
•Due days: Numbers of days and time within which the assigned task has to be completed. Note that due days are calculated from the day the workflow enters this step and not from the start of the workflow itself.
 |
•You can prevent participants from assigning this task to other users by checking the option 'Prevent Participants from delegating...'
A workflow step should have at least one participant to proceed further from this step.
|
2.Transitions:
Transitions are actions that participants can perform while the workflow is in any particular step. Transitions also move a workflow from one step to another and can perform various system actions when they are executed. Docsvault allows you to create your own user actions instead of the standard "Yes or No" and "Approve or Reject". As a workflow designer, you have a choice of adding multiple transitions to a step and decide how a document will flow in different conditions.
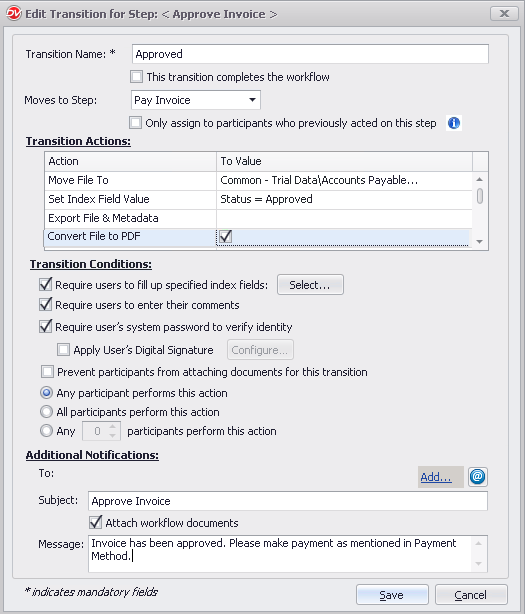
•In Transition dialog of the wizard, click on the Add button to add a new transition. A new transition dialog will open up as shown below.
•Transition Name: Enter the appropriate name for the transition. Note that this name will be displayed to users as an action that they can perform in the workflow dialog.
oThis transition completes the workflow:- Select this option if this transition is the last action in a workflow and completes the workflow process.
You can also trigger back to back Workflows on documents automatically once the current workflow is completed.
|
•Moves to Step: Specify the next step this transition will move the workflow to. You may also send the workflow back to the 'performer' of any previous step by checking the "Only assign to participants who previously acted on this step" option. This options should not be used for any steps that will happen after this step as the list of performers of a future step would not be available yet. This option can be useful in situations where the workflow needs to be routed back to a performer of a previous step for corrections.
 |
Transition Actions:
These are actions that the system can perform automatically whenever this transition is performed.
oMove File To: Moves the workflow document to specified location
oSet Index Field Value: You can assign value to index fields
Here are few examples of dynamically assigning values to index fields
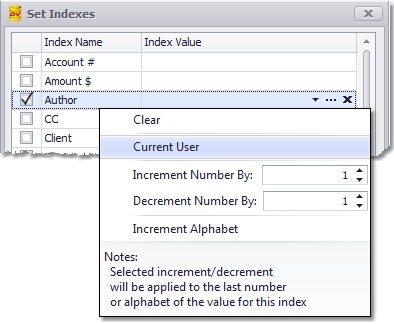
Assign Current User for data type index
You can also dynamically assign the current user's name as an index value when transitioning a workflow For example: Author
 |
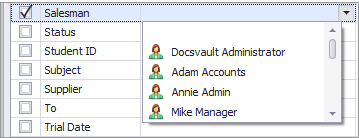
Assign Dynamic User / Group for data type index
You can also dynamically assign user/group created within Docsvault as an index value when transitioning a workflow. For example: Salesman, Staff, Employee
 |
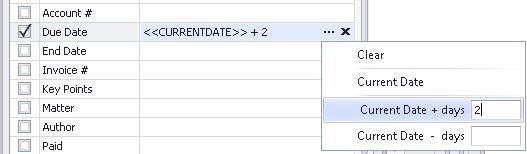
Assign dynamic dates for data type index
You can also assign dynamic dates for indexes in the workflow process e.g due date index.
 |
Auto increment/decrement for Numeric or Alphabet data type index
Docsvault provides flexibility in allowing you to automatically increment sequence for an index value. You can apply the sequence using the following increment scheme:
•Numbers ex: 1, 2, 3 or 1.1, 1.2, 1.3
•Alphabet ex: A, B, C, D
For example this feature can be used to track a revision process. You can start the workflow for a SOP document using one of the above increment scheme (such as Increment revision alphabet for the 'Revision#' index). As the revision workflow is completed and the document is ready for release the last step of the workflow will automatically increment the Revision# with the next alphabet in sequence.
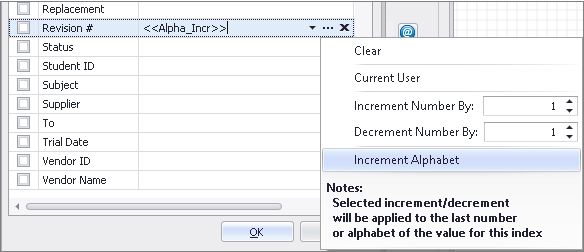 |
❖ The last number or alphabet of the selected index value is increased or decreased by specified value.
oExport File & Metadata: You can export workflow document and it's profile data during any step of the workflow. You can even create dynamic location for export.
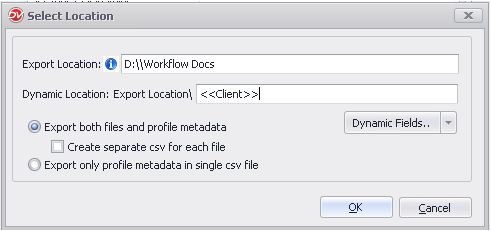 |
1.The export location should be relative to Docsvault Server and should be writable by the "Docsvault Background Jobs" service which may need to logon as a user especially if the location is a network share and not local to the Docsvault Server 2.In case the specified location is in network, ensure to use a network path (one starting with '\\') |
oConvert File to PDF: Lets you create a PDF version of supported workflow documents automatically during transition. This option is not applicable if a workflow is triggered when a new document is created by eForms or when manually importing new documents into Docsvault.
oSet Document Status: Changes or clears a document document status symbolized by a flag
oChange Security To: Set the security rights on the workflow documents using security templates. If the security on a document is cleared during the workflow process, it will automatically inherit its parent security
oRename File To: Renaming a file during transaction
oCopy File To: Makes a copy of workflow document to specified location
oEmail Using Template: Sending email using predefined Email Template
oSet Description: Set workflow document's description
oSet Document Notes: Adds document notes to the workflow documents
oSet Folder Section: Moves the workflow document to specified Folder Section
oRelate With: Set relation for the workflow document with another documents in Docsvault
oPlace Shortcut Link In: Create shortcut link for the workflow document in specific location
You can create folders dynamically based on document’s index values while copying, moving or linking to associated document in a workflow.
 Dynamically creating folder |
Transition Conditions:
•Require users to fill up specified index fields: Enable this option to prompt and mandate workflow users to fill out certain index fields before moving the workflow further
oSelect the Profile from the drop down list. Ensure that this profile is associated with the workflow document
oEnable the check-box next to the index field that users will have to fill out in order to progress the workflow. For example, getting 'payment method' while approving the invoice or prompting to select user/group for the next step
 |
•Require user to enter their comments: Enable this option to prompt and mandate workflow users to enter comments before moving the workflow further
•Require user's system password... : You can require participants to enter their Docsvault user password to perform this action to verify their identity. If you have the digital signature module you may even enable automatic digital signatures
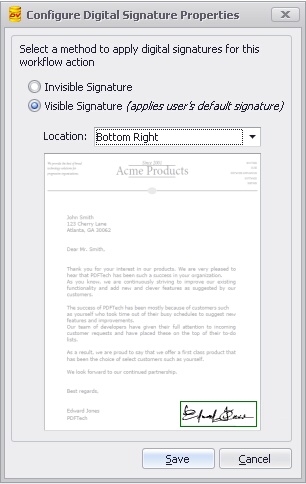
oApply User's Digital Signature: This option is used to automatically place a user’s digital signature during the transition on PDF, Word and Excel documents to create digitally signed PDFs. Click on Configure button to select the method to apply digital signatures and the position to sign the document. For more information on type of signature, see Digital Signature Add-ons section.
 |
•Digital Signature feature is only available as an add-on module and requires separate purchase and activation •Signatures are supported for PDF files only •A digital certificate should be issued in the name of the participant •The Participant should have a default signature assigned for workflow
|
•Prevent participants from attaching documents for this transaction: Enable this option to prevent participants from attaching documents when this action is selected by participants
Transition occurs when:
If there are more than one participants to perform an action on a workflow task, you can decide how many users need to perform an action for the transition to be ultimately carried out. Example you may need at least two step participants to approve a purchase order for it to be considered approved.
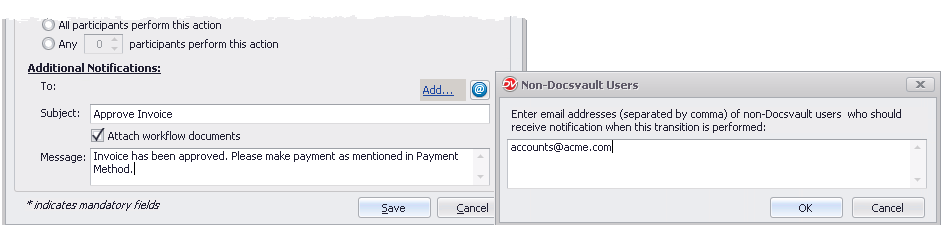
oAny participant performs this action: If you select this option, the transition is carried out if any of the step participants perform this action.
oAll participants perform this action: If you select this option, the transition will not occur until all participants perform this action. In this case, even if one of the participants performs another action in the step, the other transition is carried out instead of this one.
oAny n participants perform this action: If you select this option, specified number of participants from all available participants must perform this action for this transition to be carried out.
|
Additional Notifications:
All relevant participants of a step already get email notification when any task is assigned to them as per their personal settings. However the workflow designer can configure additional email notifications here if necessary for other Docsvault users and even for external non Docsvault users to notify them with a custom message.
To: Select the Docsvault users or groups to be notified by clicking on the Add link. You can also send notifications to external non Docsvault users by adding their email addresses by clicking on the email icon.
Subject: Enter a subject for the notification email
Message: Enter a custom message for the notification email
Attach workflow document: Enable this option to send the associated workflow document as an attachment along with the notification email.
 |
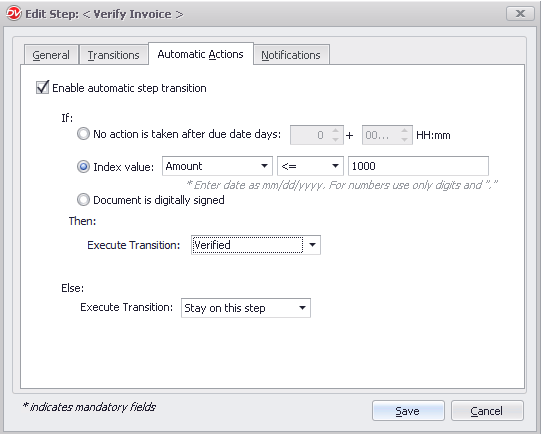
3.Automatic Actions:
You can configure an automatic transition between the current step and the next to take place when certain conditions are fulfilled. For example, Execute Transition 'Verified' if index value 'Amount' is less than '1000' else 'Stay on this step' or if no action is performed by participants after 2 days of the due date cancel a workflow.
(if) - Define a condition that must be met before the below action is performed
oNo action is taken after due date days n: Specify the number of grace days after due date for the above action to trigger
oIndex value: Specify and index value condition to be satisfied for the above action to trigger
oDocument is digitally signed: Select this option to automatically perform the action when the document is digitally signed
(Then) - Perform one of the following action if the above condition is satisfied
oExecute Transition: Select the transition to automatically move the workflow to if the specified condition is satisfied
(Else) - Perform the specified transition if the above condition is not satisfied. The else option is only available for Index Value condition is selected above in the IF clause.
oExecute Transition: Select the transition to perform if the specified condition is not satisfied
 |
4.Notifications:
This tab allows you to control various email notifications and reminders sent by the workflow engine.
Auto Emails:
oDo not send automated email notification for this step:Enable this option if you don't want the workflow to send auto email notification to participants when the workflow enters this step
oSend reminders after the due date for n times every n days: Here you can define the frequency of auto-reminders. For example, for urgent and important step you can set reminders for participants every day for three days.
Note: In order to get auto email reminders for overdue tasks, participants have to enable 'Overdue task assigned to me' alert option in their Client application from Tools > Workflow > Alerts tab
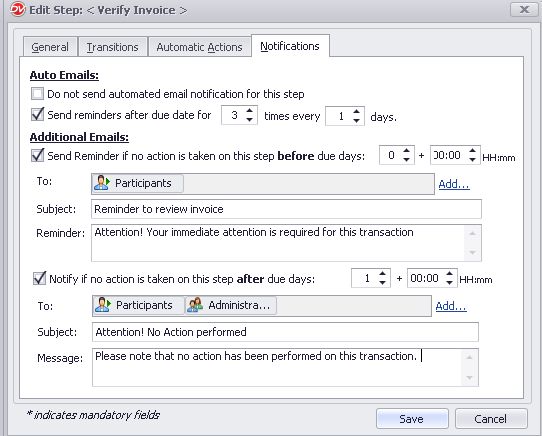 |
Additional Emails: In addition to auto reminders, you can send additional emails in a simple text format to either the participants, managers, watchers or other users in the system before and after a task is due. Example a supervisor and/or a manager can be notified if a user fails to perform an action after x day of it being due.
•Enable the appropriate notification and enter the number of days before/after a task is due
•To: Select the workflow roles or Docsvault users/groups to be notified by clicking on the Add link.
•Subject: Enter the subject of the reminder/notification email
•Message: Enter some custom content for the notification email
Repeat the above procedure (1 through 4) to add as many steps to the workflow as needed. There is no limit to the number of steps that can be added to a workflow.