Filing Documents from Filing Area
The Filing Area will display the documents for filings from Server Watch Folders and Local Collect Folders. This new filing interface allows quick document profiling and placement of imported documents.
Each user will be able to set their individual Local Collect Folder from Filing Area. When any new documents that are copied or dragged into these Collect Folder, Docsvault will immediately list the documents in the Local Collect Folders for importing.
•The documents for filing from Watch Folders will be visible to only those users who have filing rights.
|
View
Filing View lets you preview documents before you file them. Images and PDFs will be displayed in Docsvault Viewer window. You can zoom, scroll and use Rubber-band OCR to extract text and fill in fields, saving you time and effort during filing.
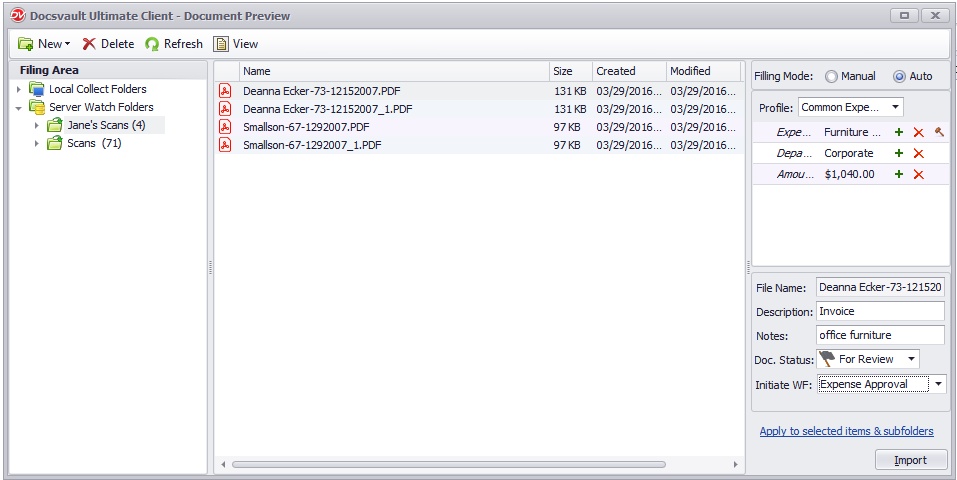 |
Local Collect Folder |
•Select the files/folders for filing.
•Select Filing Mode: Manual, Auto
Manual:
Select this mode to manually choose the destination location in Docsvault.
Auto:
Select this mode to automatically file documents based on index values. Docsvault detects or creates the destination folder and applies file naming, description, and notes based on the configured Filing Template. For more information, see Automatically Filing Documents.
Manual Filing
When Manual Filing is selected:
•Choose the destination folder from the Import Location section on the right panel.
•Selected the required Folder Section.
•You can rename the file and enter a description before saving.
•Select a Profile from the dropdown and enter index values.
•Click Heart icon or press Alt+F to open the Favorite & Recent dialog and quickly apply frequently used values.
•The DOCAI capture button allows you to extract data during import. This feature is currently available for PDF documents only.See DOCAI Add-on for more details.
•Select Apply to Selected items and sub folders to apply the same settings to all selected files.
•Click Import to begin importing your documents.
•You can set Docsvault to automatically remove imported files from their originating hard drive folders after import by setting the "Delete source files after importing'" option from the Filing Area. If this option is not set then the duplicate document remaining on the hard drive is moved to the backup folder created by Docsvault on the same location. To learn how to configure a collect folder, see Filing Area. •Unwanted or accidentally inserted files can also be deleted from the Server Watch Folders and Local Collect Folders. |