•Only users with system rights of 'Create Email Reminder Jobs' can create a reminder job.
|
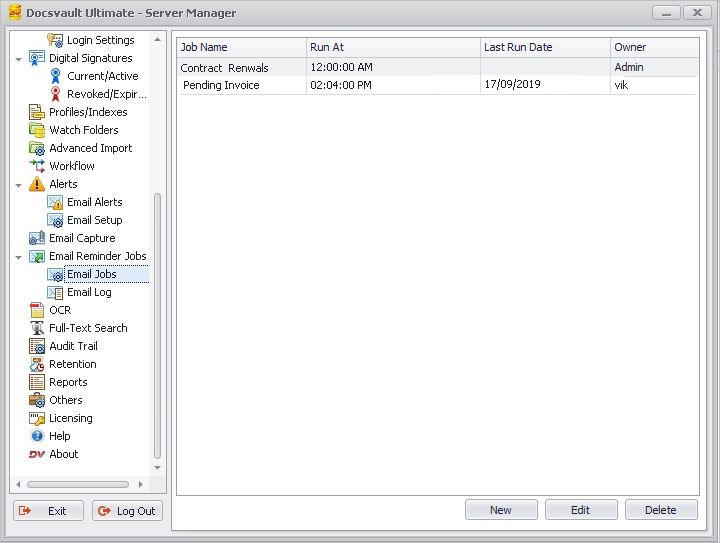
Creating Auto Email Reminder Jobs
From the Server Manager dialog on the server side click on the Email Reminder Jobs' node. Click on the 'New' button to start up the configuration wizard. OR
From the Administration Menu in Docsvault client click on “Email Reminder Jobs”
Email Reminder Jobs can be setup in 2 simple steps.
Step 1: Set job name and email rules based on Date field of a profile like due date, expiry date, etc.
Step 2: Set email template by setting up email recipients, personalizing messages using dynamic fields and attaching related documents if needed.
Step1: Job Name & Rules Configuration
•In Name, enter a relevant name for the job.
•Scope & Rule:
oScope: Select the folders on which auto emailing job should be executed. You can specify more than one folder by clicking on the Add button. Note all subfolders of the selected folder are automatically included in the scope.
oApply to: Specify whether the job should be applied on files or folders or both.
oRule Profile: Select the profile that is to be used for this job. Only profiles with date field in them are listed since date field is a necessary criteria for setting up a rule.
oRule Base Date: Select the date type index to use for this rule. In the example below, a rule is created based on Due Date from the Billing Profile
▪Additional Criteria: You have an option to add multiple rule criteria on any other indexes in the same Document Profile. In the example below, a rule is created on Due Date and Paid indexes from the Billing profile.
oSend all emails that qualify: Set this criteria by setting the relevant drop-down options. e.g Up To 2 weeks before the due date.
Using the option "Up To" will include all emails that satisfy the email rule on every day of the specified days range before or after the base index date. This means if you have a job that runs daily, it would email out the same reminder everyday as long as the email criteria is satisfied within the specified date range. If you intend to send out just single email say before x days of the rule base date, use the "Exactly" option.
|
•Set Schedule: Schedule the time to execute the email rule. e.g Daily at 12.00 pm
•User/Group who can edit this job. Select users or groups who can make changes to this job. Specifying editors is not mandatory. The person who creates the job or users specified here will be able to modify this job from under the Administration menu in their client logins.
•Click on the Next button to set an email template for this job.
 Auto Emailing : Step 1 |
Step2: Email Configuration Templates
In the Email Configuration Template dialog, enter the appropriate details such as:
•From Name: Enter the Name of the sender
•From Email: Enter the email address of the sender. Note that some email servers now require that the domain name used in the from email address match the email account domain name that is being used to send out emails. By default Docsvault uses the 'From' address used in the outgoing SMTP server settings.
•To: Enter the recipients email address. This can be static email addresses separated by a comma or a dynamic index field that contains email addresses
•CC: Enter email addresses of recipients who should receive a copy of this email
•BCC: Enter email addresses of recipients whose name and email address needs to be hidden from other recipients
•Subject: Enter a subject of the message
•Body: You can draft the email message using dynamic fields as shown in the screen shot below. Click on Email Body link to open the html editor. You can also select fields from the available Dynamic Fields drop-down list. This will dynamically replace the index values associated with a document being attached.
< RepeatText> </ RepeatText> tag can be used when you want to send one consolidated email. In the example for all matched documents. You will need to enclose document specific dynamic data fields when these “RepeatText” tags. In the example below, it will list Invoice# & Amount$ index values associated with the documents that meets the criteria.
 Auto Emailing: Step 2 |
•Attachments: Select this option in-case you wish to attach the associated file (file that satisfied the email criteria set in step 1) with this email message. You can attach additional files by clicking on 'Attach Other ...'
•Consolidate reminders in one email: Enable this option to send reminders in one consolidated email instead of separate individual email for each qualified document. Please ensure that you have a single recipient in the To, Cc and/or Bcc field as the email will only be send to one email recipient. You will also need to use the “RepeatText” dynamic variable in the body of the email so as to include dynamic data fields for all documents that qualify the specified criteria.
•Click Save to save this Auto Email Reminder job.
This is an example of a consolidate email with attachments received by recipients using dynamic variables invoice# and amount within “RepeatText” tag.
 Example of a consolidate email |